I LOVE LULU
I have been happily turning mountains of electronic parts into scrap for nearly 50 years. The quest for a well-performing, easy to build transmitter has greatly added to my slag heap. After much pleasure and pain, I am pleased to present to you, Dear Reader, a transmitter that satisfies both criteria. I offer you LULU… Back around 2000, Norberto, an Argentine ham, put together several existing concepts and came up with the basic LULU design. The LULU name is an affectation that came about in our builders group. It is easier than calling it “an LU8EHA variant” as it was known for awhile. We have made several changes to Norberto’s original design, but he would certainly still recognize it.
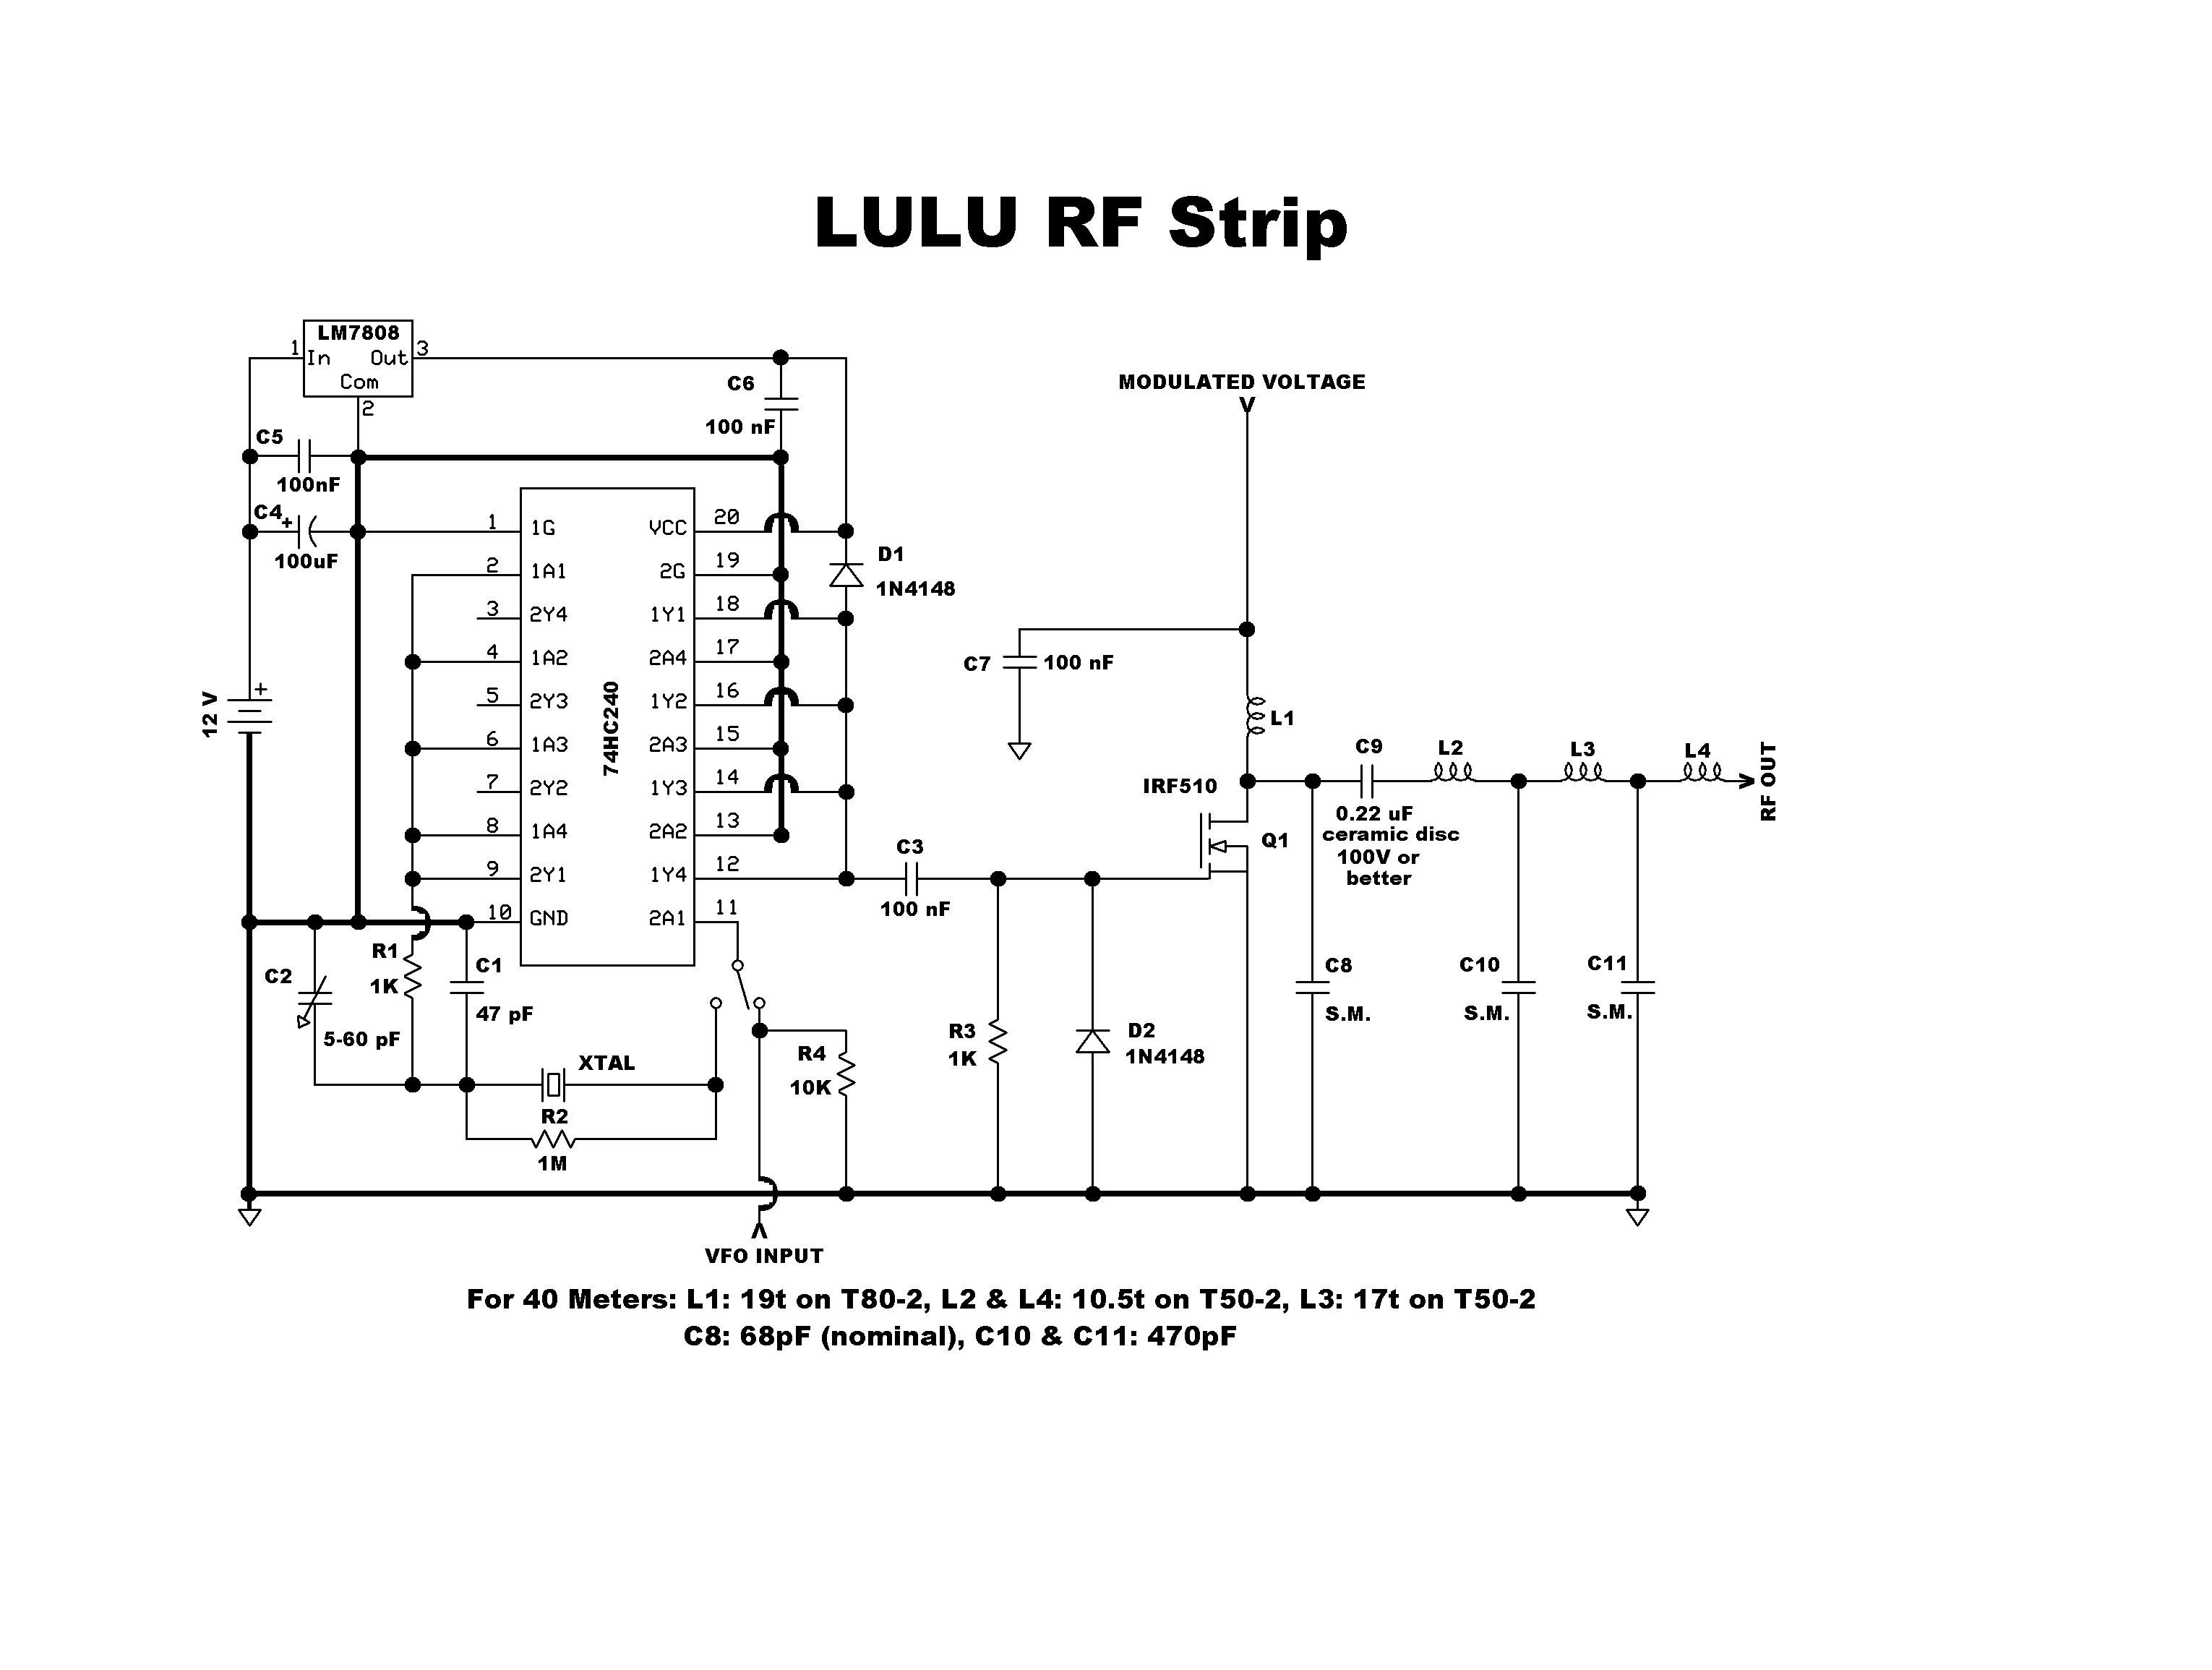
The heart of LULU is a 74HC240 octal buffer chip, which functions as an oscillator and driver. Its gates are tied together to increase its ability to sink and source current. Our active device is a MOSFET, which is turned on and off by swings of the input voltage. We will be powering our buffer chip beyond its design limits, from an 8 volt regulator. This begets a larger output voltage swing to the MOSFET than if we were playing by the manufacturer’s rules and powering the chip with 5 volts. The chip acts as a digital driver, switching the MOSFET on and off, with the RF waveform being rendered in the drain circuit. This digital method uses less parts, costs less, and generates less waste heat – advantage, LULU.
At a basic level of understanding, MOSFETS are electronic switches. If a perfect switch is turned on, zero voltage appears across it and maximum current flows through it. If turned off, maximum voltage (the supply voltage) appears across it and minimum (no) current flows through it. Unfortunately, semiconductors aren’t perfect switches. The voltage and current are always a bit out of phase, due to the MOSFET’s input and output capacitances which fight voltage changes. These phase differences cause losses which manifest as heat. Switch mode amplification has been developed to eliminate most of these losses. LULU uses Class E amplifier topology to greatly enhance signal flow through the MOSFET.
CONSTRUCTION
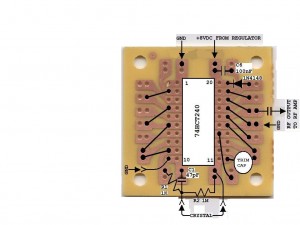
The Oscillator/Driver is the heart of LULU and you must have a properly functioning one before moving on. I use the ubiquitous Radio Shack breakout board (RS 276-159B) method, as shown above. The view is looking down on the components and jumpers side, but you “see” the copper tracing through the board, kinda like you were from the planet Krypton. You can use either the HC or HCT family of 240 chips. Keep in mind that we are running this chip very hard. I use Mil Max SIP machined pin sockets because they allow air to flow underneath the chip, keeping it cooler. This little dude will get quite warm. I suggest that you use a VOM meter to chirp test all connections before plugging the 240 chip into the socket. I usually find at least one continuity error every time I build this board. When completed, power up and check for your signal with a nearby receiver set to your frequency. If you find that the oscillator is sluggish, misfires, or won’t turn on at all, adjust trim cap C2. If there’s still no joy, try soldering some extra capacitance across the trimmer. You MUST have a well-functioning unit before moving on. If you have an oscilloscope, you should see about 12-14 Volts p-p output at C3. Be patient and do this one right. Give LULU a good heart…
Constructing LULU’s final is straightforward. The given C8 value is nominal – it will get you into the ball park. C6 is not sacrosanct. Three 0.1uF (104) discs in parallel should work fine, but keep the value in the same zip code for best results. All capacitors after the MOSFET drain (RF output and modulated supply circuits) must be at least 100V or better. All resistors can be ¼ watt. All coils are wound with #18 or 20 AWG.
TWEAKING
If you choose not to tweak, LULU will still work for you, but in Class C mode. This means that your output power will probably be less and your final will certainly run hotter. If you operate in this fashion, you MUST heat sink well. A fan might also be needed. Without tweaking, you should still see about 10 watts at the output. However, to unlock LULU’s real potential, you’ll have to tweak. The exact value of C8 will vary for differing IRF510s. Keep in mind that in Class E operation, the class E point does not always correspond with max output. Your efficiency tester will be your finger. You should be able to comfortably keep it on the MOSFET – even for 5 minutes or more. If you can’t, then keep tweaking. I often use a Mica trimmer (5-100pF, 300V) in place of C8 and tune for max output. Then finger test. If it runs too hot, try tweaking the capacitance a bit in each direction. You’ll eventually find a spot, near max output, that will also keep your finger happy. Measure the trimmer’s capacitance and replace it with a fixed cap. If you have a dual trace oscilloscope that will render well at 7 MHz, the MOSFET’s digital drive voltage at its gate will be “on” when its drain voltage is “off” and vice versa, more or less. This shows the almost perfect switch in action – maximum current through it when it is on and maximum voltage across it when it is off. IRF510s vary widely when used for RF. I have always coaxed at least 16, and sometimes as much as 22 watts out of them in this circuit.
For CW operation: Feed the modulated voltage input from the 12 volt supply and insert the key between pin 1 of the 240 chip and ground. This will keep the oscillator gate running full time, while keying the driver gates on and off.
For VFO operation: This input is included for frequency agility. If you use an outboard frequency source, its output should be about 8Vp-p, to keep the 240 happy. If unwanted, eliminate the switch and R4, and attach pin 11 directly to the crystal/R2 junction.
A switch mode transmitter like LULU is inherently narrow banded. Operation should be limited to about 50 KHz either side of your tweaking frequency.
So build patiently and I hope you have some fun putting LULU together. I will discuss AM operation in a later post… 73!


One of my bosses always said “If the resistor ain’t getting warm, then you ain’t getting your money’s worth”. Running 5V logic at 8V: I love it!
Great project!
Thanks for the kind comments, Joe. Several in our builders group including myself have used the LULU for 5 or 6 years now. Amazingly, I’ve never heard of anybody having problems with the chip. I guess your boss has the right attitude!
I’ve heard several of them on the air, they sound great.
for Variable capacitor C2, can i use fixed capacitor like 22pf or 33pf or 47pf?
Suggest suitable value of C2?.i do not have any variable caps…
The original design of lulu as well explained was made by norberto lu8eha who is the greatest radio amateur of the last times in what AM mode refers !, millions of circuits variants of his original designs travel the world today, was the pioneer in The modulation pwm brought to the world of radio amateur in 1978, today Norberto emits only in the AM mode and in its unique frequencies in 40m 7150khz and in 80m 3600 khz, it emits with homemade transmitter of 5kw AM pwm of own construction And throughout Argentina and the world have copied their designs and made variants of all types in what pwm condition solid and valvular, its transmission next to LU1DCE Jorge are the most famous in the world of radio amateur in the AM mode by having surpassed the sound quality inclusibe of the best broadcasting in the world! Obviously your end-to-end teams are totally homemade! Two geniuses! Today you can hear them live on the frequencies numbered either by a shortwave receiver or the new sdr of Argentina and bordering countries!
Realmente me alegra hayan tenido en cuenta este diseño simple pero eficiente.
Me siento gratificado por todos los que lo han armado y disfrutado
Saludos, Notrberto LU8EHA
C8, should be 680p, keeps the voltage @ 3.5 X Vcc.
The low value of 68p is incorrect sand wont lower the voltage and will eventually blow the FET.
Also the IRF510 wont work!
It’s need to be a IRL as the 8V drive will drive it to fully on, it wont with the IRF as it’s needs around 10V.
Otherwise it’s the best and simplest design out there, have made 100’s of these.
You can use an IRF640 at freqs below 5MHz, run from 24V and get a 40W carrier!
Oh, forget those T50’s way too small, even for 10W.
Make them ALL T94-2’s or T106-2’s for 40W one.
Str.